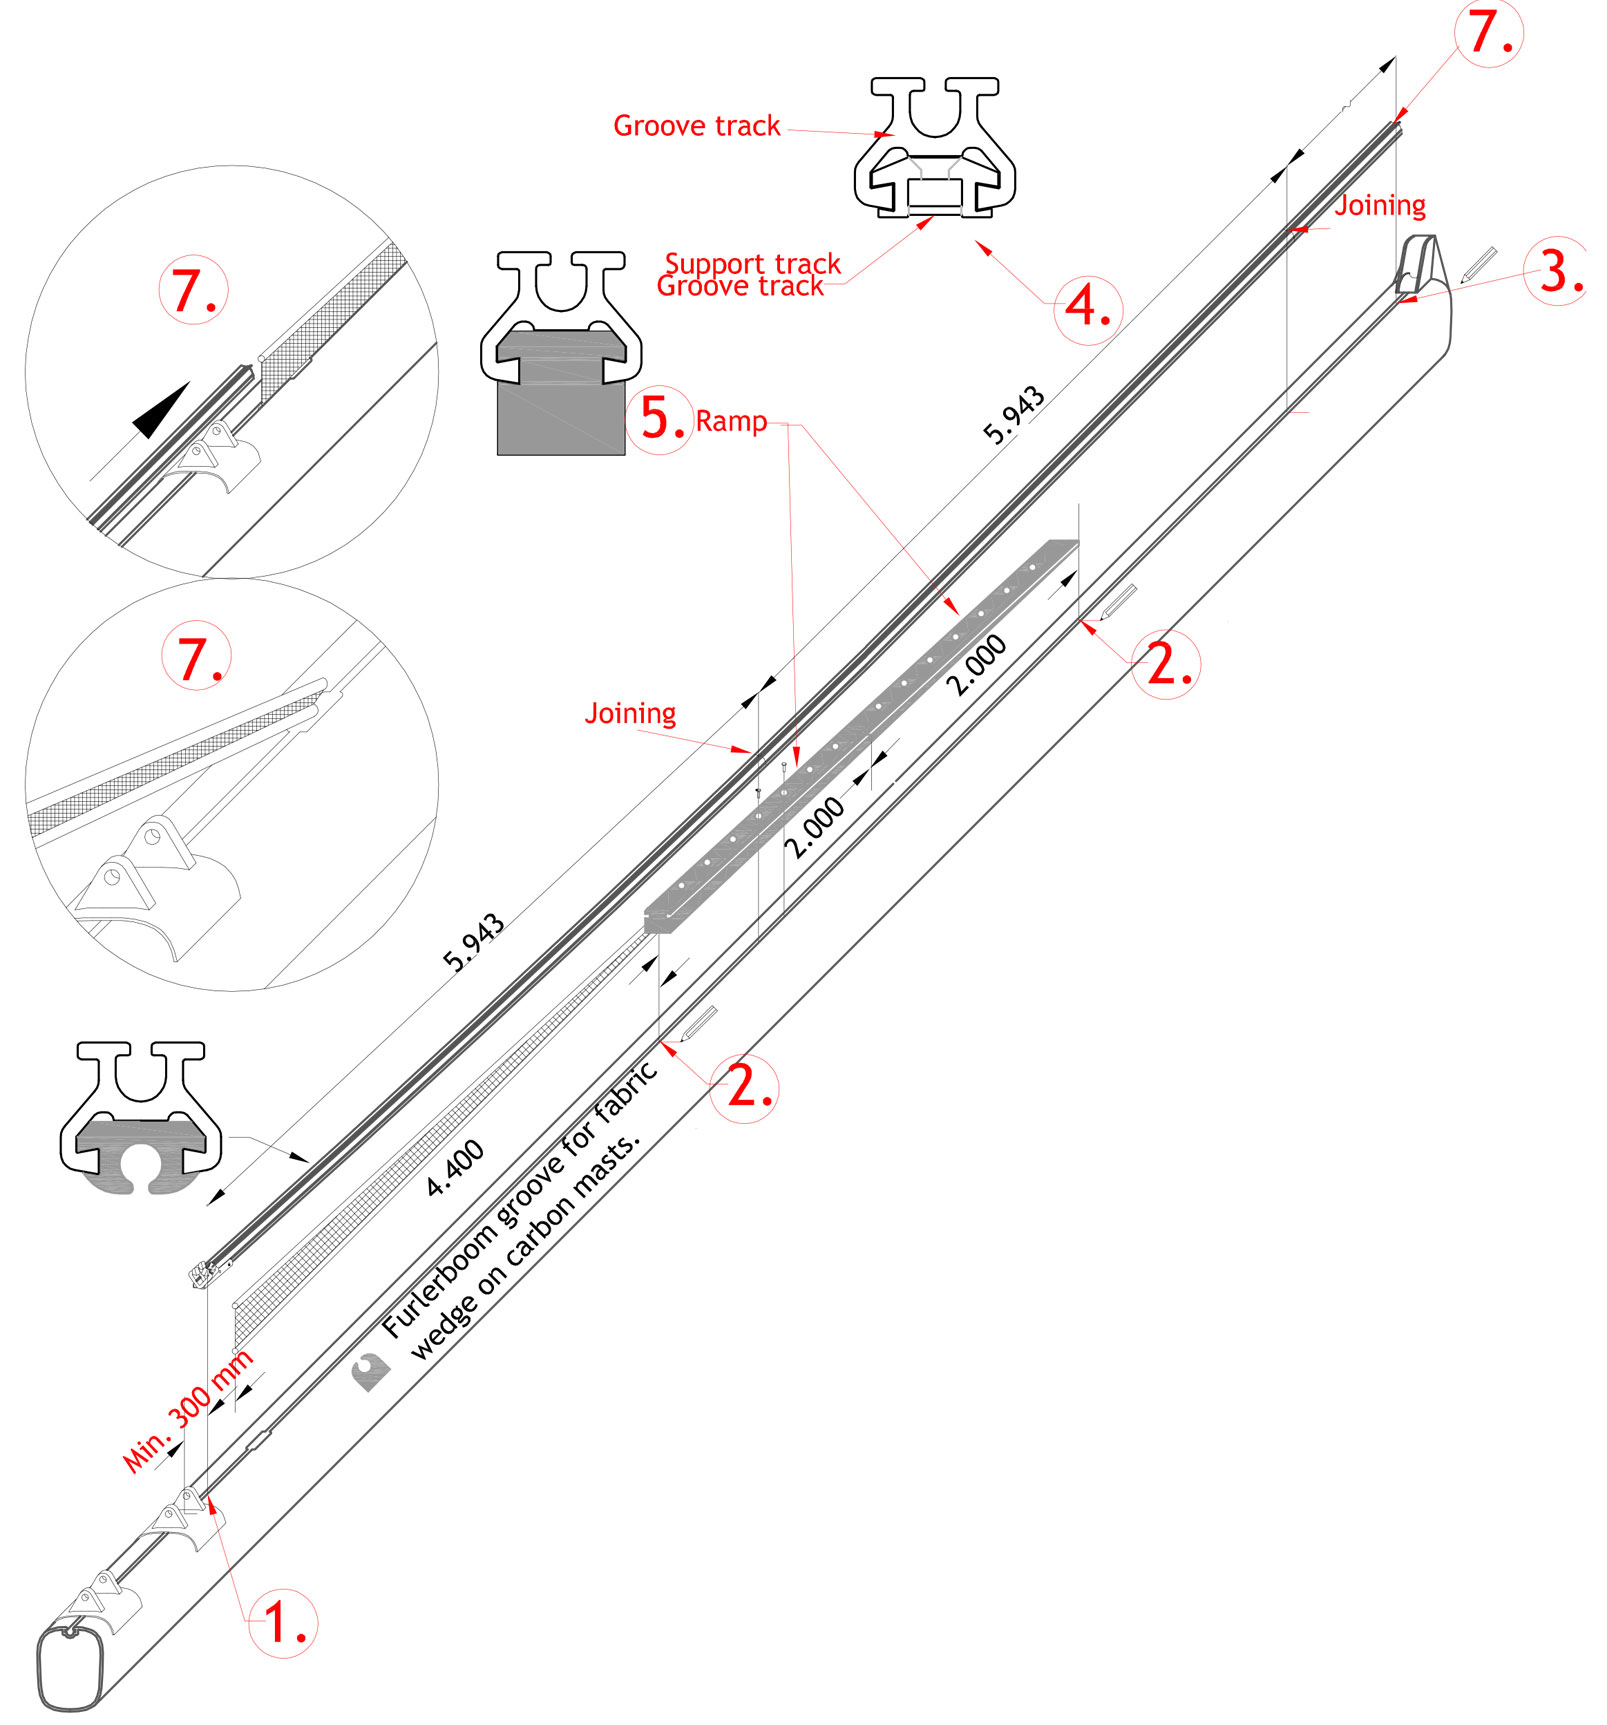
Installation Guide for mast track #1 and #2
The installation must take place while the mast is placed- horizontal
-

1. Place the sub-rail on the mast with a 50mm distance to from the top of the mast. Place the POM-ramp in a direct extension of the sub-rail. Make a mark at the end of the rail and POM-ramp also mark all the holes. Be aware that there is a 5mm and 6mm hole in the sub-rail. Make sure only to mark the hole that fits the slugs you have received or the thread that shall be made in the mast. Be observant, on masts with no sail-groove, or were the slugs doesn't fit the sail groove. In case the slugs doesn't fit the sail-groove it's necessary to make a thread in the mast. Drill and thread-tapping tools is not included.
-
2. Make a mark at 4.500mm from the bottom of the POM-ramp. This marks the bottom part of the mast-rail. Make sure that the distance between the bottom part of the mast-rail and the center of the boom bracket is inside the mast track offset of the relevant boom size.
Mast track offset Boom size Min offset Max offset T15 240mm 340mm T18 260mm 360mm T20 280mm 400mm -
3. If the Sunbrellea doesn't fit or if there isn't any sail groove on the mast, a support rail is necessary to install on the mast. Place the sub-rail to the support-rail in extension of the POM-ramp and mark the end and the position of the holes for drilling.
-
4. Make sure there is the right numbers of slugs and place them in the sail-groove so they fit with the markings of the holes.
-
5. If there is a support-rail for the Sunbrellae, must it to be installed first.
-
5.1 Place the sub -rail and support-rail together so that it fits with the markings and screw it to the slugs, or in the thread in the mast, with the supplied screws
-
5.2 IMPORTANT!! Slide the support-rail over the under-rail. This will not be possible after the POM-ramp is installed
-
6. Place the POM-ramp and sub-rail on the mast, make sure they fit the markings.
-
7. Screw the POM-ramp to the slugs, or in the thread, with the supplied screws.
-
8. Make sure that the sub-rail is in a direct extension of the POM-ramp, and screw them to the slugs or int he thread, with the supplied screws.
-
9. The mast-rail is slid on from the POM-ramp. The Mast-rail is divided into 3 to 4 parts. The shortest part has a stop block at the end, this part is slid in first, so that the stop block is positioned at the top end of the mast. When the first part has been installed proceed to slide in the rest of the mast-rails.
-
10. The Sunbrellae is fastened on the last part of the mast-rail. Slide in the Sunbrellae in the mast-rail, or support-rail, while the mast-rail is slid on. Make sure that the hanger in the end of the Sunbrellae is also slid in to the mast-rail or the support-rail.
-
11. When the mast-rail is properly placed, drill the holes and thread in the sub-rail. Make them through the pre-drilled holes in the mast-rail. The holes are placed in both ends and in the middle of the mast-rail, on each part of the mast-rail. Use the supplied drill and the thread-tapping tool to make the holes and the threads. Use the supplied screws to attach the mast-rail to the sub-rail.
-
12. Tighten the Sunbrellae to the POM-ramp with the cord in the ramp, and tighten the slugs in the other end to ensure that the Sunbrellae is properly secured.
-
13. The mast-rail is now installed.
If problems occurs during the installation, Furlerboom can be contacted for further assistance.
Download installation guide (UK) >
Installations Guide DK
Installationen skal foregå imens masten er lagt ned.
-
1. Placer under-skinnen på masten så den har en afstand på 50mm fra toppen af masten. Placer POM-rampen i en direkte forlængelse af under-skinnen. Lav en markering ved skinne og rampe ende, samt ved alle relevante huller. Vær opmærksom på at der er et Ø5mm og Ø6mm hul i under-skinnen. Lav kun markering ved det hul der passer med de slugs der er med, eller det gevind der skal laves i masten. OBS! på master uden sejlrille, eller hvor slugsene ikke passer i sejlrillen, skal der bores huller og laves gevind i masten. Bor og snittap medfølger ikke.
-
2. Lav en markering 4.500mm fra nederst på POM-rampen. Dette markere den nederste del af maste-skinnen. Kontroller at afstanden mellem den nederste del af maste-skinnen og center på bombeslaget er inden for, mast track offset, til den relevante bom størrelse.
Mast track offset Boom size Min offset Max offset T15 240mm 340mm T18 260mm 360mm T20 280mm 400mm -
3. Hvis Sunbrellean ikke passer i, eller at der ikke er nogen sejlrille på masten. Skal der installeres en support-skinne på masten. Placer under-skinnen til support-skinnen i forlængelse af POM-rampen og marker enden og hvor hullerne skal bores.
-
4. Sikre at der er det korrekte antal slugs og placer dem i sejlrillen så de passe med markeringerne til hullerne.
-
5. Hvis der er en support-skinne til Sunbrellaen, skal den installeres som det første.
-
5.1 Placer under-skinnen til support-skinnen, så den passer med markeringerne og skru den fast i slugsene, eller gevindet i masten, med de medfølgende skruer.
-
5.2 VIGTIGT!! Glid support-skinnen ned over under-skinnen. Dette bliver ikke muligt efter POM-rampen er sat på plads
-
6. Placer POM-rampen og under-skinnen på masten så de passer til markeringerne.
-
7. Skru POM-rampen fast i slugsene, eller gevindet, med de medfølgende skruer.
-
8. Sikre at under-skinnen er i en direkte forlængelse af POM-rampen, og skru dem fast i slugsene, eller gevindet, med de medfølgende skruer.
-
9. Maste-skinnen glides på fra POM-rampen. Maste-skinnen er delt i 3 til 4 dele. Den korteste har en stop klods på enden og glides på som den første, således at stopklodsen er placeret øverst på masten. Glid derefter de andre maste-skinner på.
-
10. Den sidste del af maste-skinnen har sunbrellaen fastgjordt. Her skal sunbrellaen glides i maste-sporet, eller support-skinnen, imens maste-skinnen glides på. Sikre at bøjlen i enden af sunbrellaen også kommer med ind i maste-sporet, eller support-skinnen.
-
11. Når maste-skinnen er ordenligt placeret, skal der bores hul og laves gevind i under-skinnen. De skal laves i gennen de præ-borret huller i maste-skinnen. hullerne er placeret i begge ender samt i midten af maste-skinnen, på hver del af maste-skinnen. Brug de medfølgende bor og snittap til at lave huller og gevind. Brug derefter de medføglende skruer til at fæstne maste-skinnen til under-skinnen.
-
12. Spænd Sunbrellaen fast til POM-rampen med den snor der er i rampen, og spænd slugesene i den anden ende, for at sikre at sunbrellaen er ordenligt fastspændt.
-
13. Maste-skinnen er nu installeret.
Opstår der problemer under vejs kan Furlerboom kontaktes for yderligere assistance.
Download installations guide (DK) >
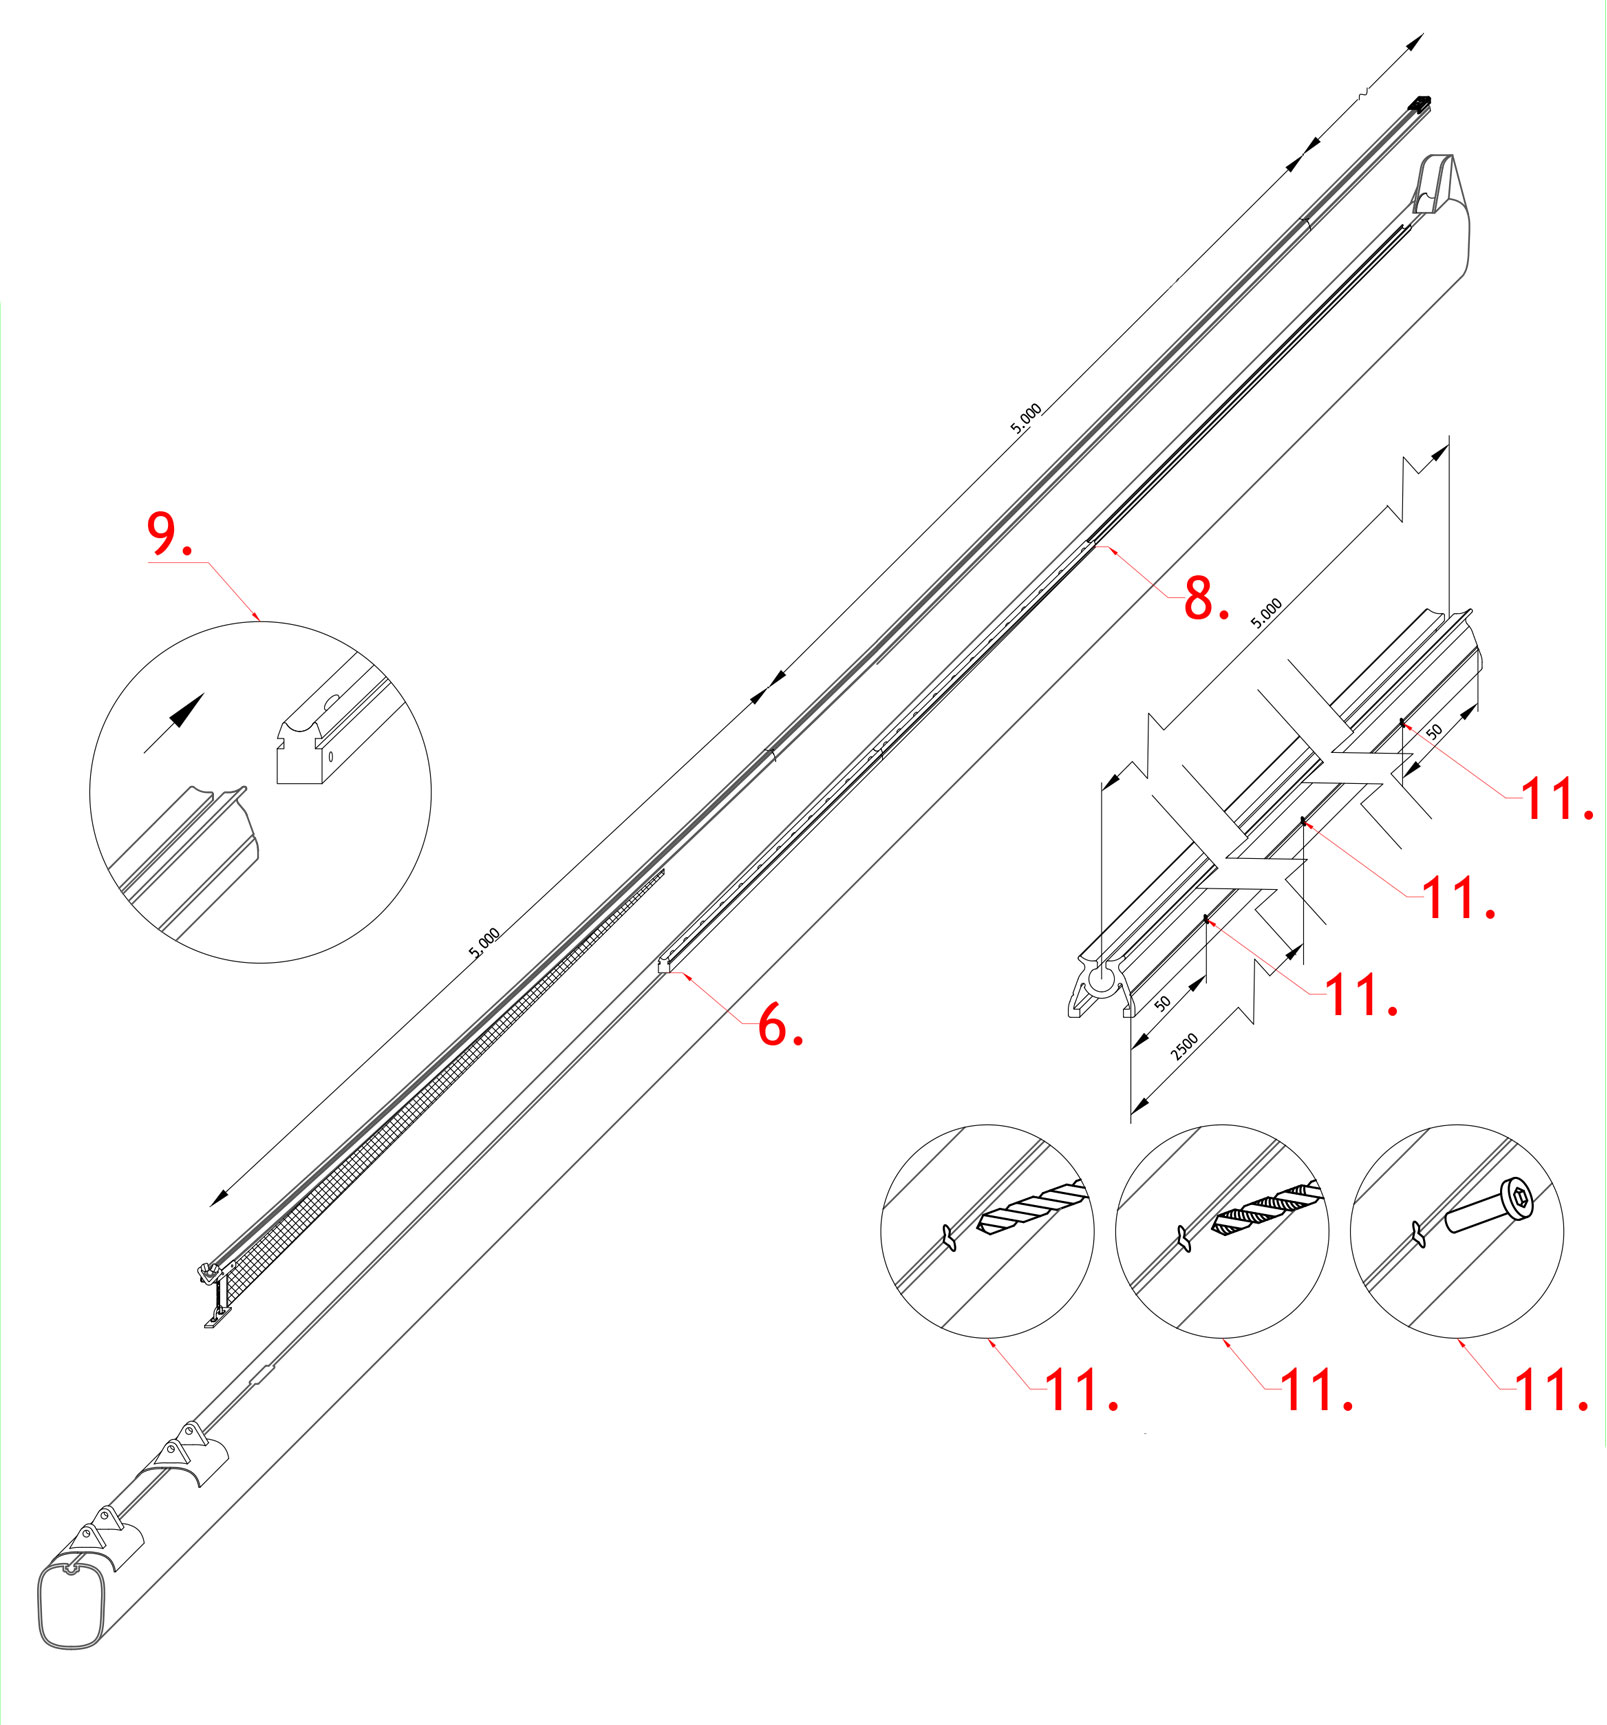
How to install mast track #2
-
1. The tracks are made to finished length from Furlerboom.
Start to place the groove tracks loosely on the mast to check if the distance from the feeder to the middle of the gooseneck is min. 300 mm. -
2. Mark the joinings between the fabric ramp, plastic ramp and support track.
-
3. Now the upper end of the tracks is defined. (Any corrections of the track length, must be made at the upper end only and equally on support - and groove track).
Fit the support track with M 6 screws starting from the upper end with the distance between defined be Furlerboom. (Distance between holes in track is 50 mm and will be used only on yachts with very high righting moment). Do not fit the ramp yet.
On none groove masts (mostly carbon) drill Ø 5 and tap for M6 + Epoxy glue. On masts with a groove, slugs and screws with a drop of Lock-tite is used. -
4. Slide the groove tracks, except the two lower, on the support track. Fasten the groove track with the end cap into the threaded holes in the support track.
-
5. Fit the ramp in the same way as the support track.
-
6. Slide the next groove track on the plastic ramp. As this is slightly curved, friction is enlarged.
So bending the mast forward or the groove track backwards will make the sliding easier. -
7. Slide the fabric ramp into the mast groove.
Slide the lower groove track over the fabric ramp and into a tight fit to groove track 2 and drill Ø 5 holes through the M 6 threaded holes on both sides of the joining. Fit the M 6 index flush with the surface. If the holes in the plastic are not tapped, there is no need for lock-tite. -
8. Fit the Dyneema strap connection between mast and feeder.